Adding a Toolbar and Navigation Drawer Across all Activities of an Android App
21 Jun 2015Gone are the days of using the sucky actionbar. With the introduction of Android 5.0, the actionbar has been replaced by the toolbar. The Toolbar allows more customization and can be placed anywhere in the UI since it’s just a viewgroup. In order to use the toolbar as an actionbar, you must declare it in your xml and set it as the support action bar in the activity.
But what if you want the toolbar to be constant throughout your app without having to declare it in each one of your activities? In this tutorial, I will show you how to set up the toolbar for all your activities and as an added bonus, we will setup a navigation drawer as well.
Setting up the project
Create a new android project using your preferred method. I will be using Android studio and Gradle for this tutorial and I suggest you do as well.
I’m setting the API level to 16 but you can set yours to any version you like. Since we will be using the support library, you can go back as far as API level 7.
Open the build.gradle file for the main module of your project and add the appcompat v7 support library. Usually, this is under a folder called “app” or “mobile.” The support library might already be in your build.gradle, but if it’s not, add it under dependencies:
dependencies {
  compile 'com.android.support:appcompat-v7:22.2.0'
}
Let’s also add the support library v4 and the design support library which we will use to set up the navigation drawer:
dependencies {
  ...
  compile 'com.android.support:support-v4:22.2.0'
  compile 'com.android.support:design:22.2.0'
}
If you didn’t create an activity when you created your project, go ahead and create a new blank activity.
Setting up the Toolbar
Open the styles.xml file that should be under res/values and change its content from:
<resources>
  <style name="AppTheme" parent="Theme.AppCompat.Light.DarkActionBar">
  </style>
</resources>
to:
<resources>
  <style name="AppTheme" parent="Theme.AppCompat.Light.NoActionBar">
  </style>
</resources>
This will disable the old actionbar so that we can add our custom toolbar instead.
Create a new activity called BaseActivity and a corresponding layout called activity_base.xml.
Open the activity_base.xml and replace its content with the following code:
<android.support.v4.widget.DrawerLayout
    android:id="@+id/activity_container"
    android:layout_width="match_parent"
    android:layout_height="match_parent"
    xmlns:android="http://schemas.android.com/apk/res/android"
    xmlns:app="http://schemas.android.com/apk/res-auto">
    <LinearLayout xmlns:android="http://schemas.android.com/apk/res/android"
        android:layout_width="match_parent"
        android:layout_height="match_parent"
        android:orientation="vertical">
        <android.support.v7.widget.Toolbar
            android:id="@+id/toolbar"
            android:layout_width="match_parent"
            android:layout_height="?actionBarSize"
            android:background="@color/background_material_dark"
            />
        <FrameLayout
            android:id="@+id/activity_content"
            android:layout_width="match_parent"
            android:layout_height="wrap_content" />

    </LinearLayout>
    <android.support.design.widget.NavigationView
        android:id="@+id/navigationView"
        android:layout_width="wrap_content"
        android:layout_height="match_parent"
        android:layout_gravity="start"
        app:menu="@menu/menu_base"/>
</android.support.v4.widget.DrawerLayout>
It’s time to set up our base activity. We will override the setContentView method so we can hijack the view and attach it to our container instead of the android default container.
Open BaseActivity.java and make sure to remove setContentView(R.layout.activity_base) from the onCreate() method.
Now let’s override the setContentView() method with our own implementation:
@Override
public void setContentView(int layoutResID)
{
    DrawerLayout fullView = (DrawerLayout) getLayoutInflater().inflate(R.layout.activity_base, null);
    FrameLayout activityContainer = (FrameLayout) fullView.findViewById(R.id.activity_content);
    getLayoutInflater().inflate(layoutResID, activityContainer, true);
    super.setContentView(fullView);
    Toolbar toolbar = (Toolbar) findViewById(R.id.toolbar);
    setSupportActionBar(toolbar);
    setTitle("Activity Title");
}
Open your main activity and make sure it extends BaseActivity:
public class MainActivity extends BaseActivity {
	...
}
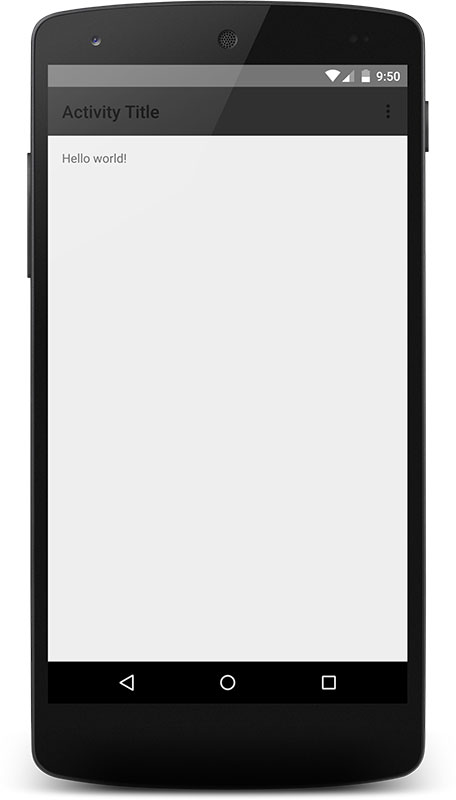
Compile and run your app. It should now have a toolbar and look similar to this:

You can also swipe from the left to open the navigation drawer.
Allowing activities to opt-out of having a toolbar
What if you have an activity that doesn’t need a toolbar? Let’s change our base activity to allow its children to not display a toolbar.
Add a new method to BaseActivity called useToolbar that returns true by default:
protected boolean useToolbar()
{
    return true;
}
Modify the setContentView method of the base activity as follows:
@Override
public void setContentView(int layoutResID)
{
    DrawerLayout fullView = (DrawerLayout) getLayoutInflater().inflate(R.layout.activity_base, null);
    FrameLayout activityContainer = (FrameLayout) fullView.findViewById(R.id.activity_content);
    getLayoutInflater().inflate(layoutResID, activityContainer, true);
    super.setContentView(fullView);
    Toolbar toolbar = (Toolbar) findViewById(R.id.toolbar);
    if (useToolbar())
    {
        setSupportActionBar(toolbar);
        setTitle("Activity Title");
    }
    else
    {
        toolbar.setVisibility(View.GONE);
    }
}
Any activity that wants to opt out from having a toolbar just needs to override the useToolbar method and return false.
Gotchas
One of the things to consider when using this approach is that every activity inflates a toolbar. During your activity transitions, the toolbar will animate with your activity. You can get around that by using Shared Element Transitions